
In large-scale bottling projects, “the cap fits” is not the same as “the package won’t leak”—especially when you’re managing procurement for multi-location lines, high throughput, and long distribution routes.
Leak-free packaging is a system outcome. Bottle neck finish, cap size (and thread profile), liner choice, application torque, line settings, and shipping stress all stack together. Many buyers only verify one or two of those variables, then get surprised when a pilot run looks fine but the first container shipment triggers seepage, torque drift, or sporadic cross-threading.
This guide is written for buyers and packaging teams who need a repeatable decision path—one you can use in RFQs, pre-production checks, and scale-up approvals.
Why “It Fits” Still Leaks in Real Projects
For buyers managing multi-location spaces—meaning multiple plants, multiple cappers, multiple operators—the same closure system can behave differently from site to site. A line that applies slightly higher torque, a neck finish that trends toward the upper end of tolerance, or a liner that relaxes after temperature cycling can all move you from “pass” to “problem.”
Most leakage isn’t caused by a single defective cap. It’s caused by mismatch in how the system seals:
A thread can hold the closure on the bottle while the sealing land never compresses evenly. A liner can look correct on paper but lose performance after vibration, altitude changes, or repeated thermal swings. Torque can be “high” yet still be “false torque” when cross-threading or liner skid prevents consistent compression.
When you treat closure fit as an engineering verification—not a catalog selection—your leakage risk drops fast.
Step 1 — Identify the Bottle Neck Finish the Way Suppliers Do
The bottle neck finish is the interface where the container’s threads and sealing surface meet the closure. Industry guides generally define it as the threaded neck area that connects to a cap or closure and holds it in place.
In procurement, you’ll see neck finishes described in formats like “28-410,” where the first number commonly refers to diameter, and the second relates to a standard height/thread style family. What matters is not the label itself; it’s what that label implies about thread profile, thread turns, and the geometry of the sealing land.
What measurements matter (and what buyers often measure wrong)
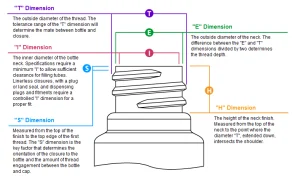
In commercial packaging manufacturing, the frequent mistake is measuring only the outer diameter at the very top and calling it “28mm.” That can get you close—but “close” is where leakage lives.
You want the dimensions that control both thread engagement and seal compression. In practice, teams often use key dimensions such as thread diameter and related geometry, along with height references that influence how the closure seats.
From our experience in commercial packaging manufacturing, the fastest path is to treat the bottle finish drawing (or a physical sample) as the “source of truth,” and confirm the critical dimensions before anything goes into print, tooling, or volume planning. Yantai Original’s internal verification process, for example, relies on measuring T, E, and H dimensions from drawings or physical samples to recommend a matched cap specification.
Common neck finish systems buyers run into
If you buy into multiple markets, you’ll run into different standards and naming conventions. The practical takeaway is simple: don’t assume that “28mm” is interchangeable across thread families. Even within commonly used systems, a small change in thread style can shift the seating behavior and torque profile.
In large-scale commercial projects, that assumption is expensive. If your cap inventory was ordered against a “near match,” the corrective actions tend to be rework, relining, retorquing, or—worst case—scrapping decorated closures.
Step 2 — Choose Cap Size and Thread to Match the Finish (Not the Catalog Name)
Once the bottle neck finish is confirmed, cap size selection becomes less guesswork and more mapping: the closure’s thread profile must mate cleanly with the container’s threads, and the closure must land on the sealing surface with predictable compression.
Many neck finish guides emphasize that a matching cap should share the same width and thread style to fit properly. For a broader view of cap types and manufacturing quality checks, it helps to understand how materials and QC affect sealing consistency when you scale.In practice, “fit properly” means you can achieve consistent application torque without cross-threading, liner shear, or uneven contact.
The two fast failure modes: cross-threading and false torque
Cross-threading is obvious when it’s severe. The tricky cases are partial misalignment and intermittent starts—common when line speeds increase or when operators swap cap chucks without recalibration.
False torque is the more damaging cousin. The cap tightens, the torque reading looks healthy, but the liner never compresses evenly against the sealing land. In distribution, those are the closures that seep slowly and show up as “random leakage” weeks later.
When you should move from “fit” to “fit + tolerance”
For buyers managing multi-site production, tolerance is where the real decision happens. One plant might run bottles from Mold A and another from Mold B, or you might change glass suppliers and not realize that dimensional drift moved the finish toward a tolerance edge.
That’s why one-stop packaging approaches can reduce risk: when the bottle and cap are sourced together, the system can be verified as a set, not as two separate components that “should” match. On Yantai Original’s own About Us page, the company highlights supplying glass bottles and bottle caps together specifically to help avoid leakage.
Step 3 — Select the Right Liner Based on Product, Barrier Needs, and Process
Liner selection is where many otherwise-correct systems fail. Liners aren’t accessories. They are engineered sealing media with specific behaviors: compressibility, recovery (how they rebound after torque), chemical compatibility, and barrier performance.
Industry liner references commonly distinguish liner types by function—pressure-sensitive seals, foam variants, laminated materials, and higher barrier options—each with tradeoffs around oxygen transmission, reseal behavior, and resistance to certain product chemistries.
In commercial projects, you should anchor liner choice to four realities: what’s in the bottle, how it’s filled and capped, how it ships, and how long it needs to hold performance.
Liner choice is a sealing strategy, not an accessory
Consider two real scenarios:
A still beverage that ships regionally and is consumed quickly might tolerate a liner that balances seal integrity with practical opening torque. A spirit or premium liquid intended for longer shelf life may prioritize stronger barrier behavior and long-term stability.
Some liner resources note that higher barrier options are used when the goal is to limit oxygen ingress, while other liner constructions allow more controlled permeability depending on product needs. The point isn’t to chase a “best” liner; it’s to match performance to your product and distribution profile.
A buyer-friendly decision logic for liner selection
In large-scale commercial projects, your liner decision should be defensible in an RFQ conversation. You can frame it as: product type and volatility; carbonation or internal pressure; alcohol content level; target shelf life; temperature exposure; and the line’s ability to apply stable torque.
Yantai Original’s service process describes selecting liners (including PE, Saranex, and Tin-saran options) based on liquid type such as carbonated versus still, and high alcohol versus low alcohol, to support pressure resistance and sealing performance.
This kind of rule-based approach is exactly what procurement teams need, because it can be repeated across SKUs and plants.
The most common liner mistakes that cause leakage after shipping
Leakage after shipping is rarely explained by “a bad batch.” More often it’s one of these patterns:
A liner that compresses well at application but relaxes under vibration, allowing micro-paths for seepage. A liner surface that skids during capping, creating uneven compression. Or a liner-product mismatch that shows up only after exposure—think oils, alcohol, or aggressive formulations that change the interface over time.
Step 4 — Torque and Sealing: Where Most Leak-Free Plans Fail
Torque is the control knob buyers don’t always treat like a specification. Many torque references warn that over-tightening can cause an uneven seal and leakage, while under-tightening can also cause leakage—meaning “tighter” is not automatically “better.”
From our experience in commercial packaging manufacturing, torque should be treated as a window, not a single number, because bottles and caps have variation, and liners recover differently after application.
Why “tight” is not a specification
When torque is too high, you can distort threads, damage sealing surfaces, or over-compress the liner so it can’t recover. When torque is too low, you may never achieve sufficient compression to maintain seal integrity through temperature and vibration.
Torque guidance commonly distinguishes application torque and removal torque, and notes that removal torque after dwell time can be a practical way to monitor whether the system is holding.
What to confirm with your filling line team before approving the closure
For buyers managing multi-location lines, this is where leakage prevention becomes operational:
If Plant A uses one capping head design and Plant B uses another, the same closure may end up with different torque profiles. If your line runs faster, caps can be applied with less consistent thread engagement. If your bottles run warm or cold, the material interface shifts.
A supplier who can support torque and sealing verification during development reduces this risk. Yantai Original notes conducting torque tests and sealing tests as part of QC before packaging.
Step 5 — Validation Tests for Leak-Free Packaging (Procurement-Ready)
If you want fewer surprises after the first shipment, validation must mimic reality. Container closure integrity references often connect stability testing (heat/cold cycling) and transport tests (vibration, drops, compression) to whether seals stay intact under distribution stress.
In large-scale commercial projects, you don’t need an overbuilt lab program to catch most failure modes. You do need a disciplined sequence:
First, confirm fit with drawings or physical samples. Then cap on the actual line, at real speeds, and track torque behavior. Then run basic distribution stress—temperature changes and vibration—because those are the conditions that turn marginal seals into leaks. Packaging testing sources regularly describe distribution testing as a combination of vibration, shock/drop, compression, and atmospheric exposure.
If you want an external reference point, leakage testing standards also exist for evaluating gross leakage during distribution-like orientations and handling, which reinforces the idea that “upright” performance alone isn’t enough.
The One-Stop RFQ Checklist: What to Send Suppliers to Avoid Rework
Procurement teams often lose weeks because the RFQ doesn’t contain the details suppliers need to make a confident recommendation. A clean RFQ narrative can include: the bottle neck finish code if known; the bottle finish drawing or a physical sample; the product type (still, carbonated, alcohol content range); target shelf life; fill and cap temperatures; your capping method and line speed; your desired decoration method and artwork format; and your expected distribution conditions.
This mirrors the “technical verification first” approach described in Yantai Original’s ODM/OEM process: confirming bottle neck dimensions (T, E, H), selecting cap size and liner based on the liquid type, and then moving to design proofing and production.
For buyers managing multi-location supply, add one more sentence: specify whether the same closure must run across multiple cappers, because that changes how conservative your torque window and liner choice should be.
About Yantai Original

Yantai Original positions itself as a flexible bottle cap exporter and packaging supplier, including aluminium caps and related closure types, with support for small-quantity custom logo projects and combined bottle-and-cap supply to help prevent leakage issues. The company’s internal profile describes a one-stop packaging model that integrates aluminium caps, glass bottles, and cartons, with an emphasis on matching verification to avoid tolerance mismatch between different suppliers.
From a project execution perspective, that one-stop “perfect fit” approach is most valuable when you’re scaling: the same supplier can verify bottle finish dimensions, recommend the cap specification, and align liner selection to your liquid and distribution conditions.
Yantai Original also states production capacity figures (automated cap lines and glass bottle lines) and global shipment footprint that can matter for procurement planning.
Conclusion
Leak-free packaging is rarely solved by swapping “a better cap” into the same system. It’s solved by matching bottle neck finish, cap size and thread geometry, and liner selection—then confirming the torque window on the real line and validating performance under the stresses that actually trigger leaks: vibration, compression, and temperature cycling. In large-scale commercial projects, this approach turns closure selection into a repeatable procurement workflow, not a trial-and-error exercise.
FAQs
What is a bottle neck finish, and how do I measure it for closure compatibility?
A bottle neck finish is the threaded neck interface where the container connects to the cap or closure. For compatibility, measurement should go beyond “neck diameter” and focus on the geometry that controls thread engagement and seal seating. Many buyers use finish codes like 28-410 as a starting point, but verification with a finish drawing or physical sample helps avoid tolerance-related surprises at scale.
How do I choose the right cap liner to prevent leakage after shipping?
Start with your product chemistry and distribution reality. Liner types vary in compressibility and barrier behavior, and shipping stress can expose marginal seals through vibration and temperature swings. In procurement terms, define whether you need higher barrier performance, whether the product is carbonated or high alcohol, and whether the line can control torque consistently—then validate with capped samples through transport-like conditions.
What torque range should I use for leak-free packaging on a capping machine?
Use a torque window rather than a single number. Torque guidance commonly warns that both over-tightening and under-tightening can cause leakage, because sealing depends on even liner compression and stable thread engagement. Set an initial target based on closure and container recommendations, then confirm by measuring removal torque after dwell time and after temperature/distribution exposure to see whether retention holds.
Why does a cap fit but still leak—and what’s the fastest way to troubleshoot?
A cap can fit mechanically while failing to seal consistently. Common causes include cross-threading, false torque, uneven liner compression, or mismatch between liner material and the product or distribution conditions. The fastest troubleshooting path is to confirm the neck finish dimensions, check thread start behavior on the line, verify torque retention after 24 hours, and run a short distribution-style stress cycle (vibration plus temperature change) to reproduce the failure.